.jpg) |
| Compact Fluorescent Lightbulb |
Friday, 26 December 2014
Lighting
The general plan for the lighting was to have a limited amount of it. The film has a very constricted start (in a corridor) which then moves into a tense conversation. One light source casting from one place would help to create the thriller sense we wanted to practice for the main, 2 minute thriller piece.
We used a compact fluorescent lightbulb with umbrellas and stand. The lightbulb itself is pointed into the umbrella, which can be either plain white or a reflective metallic. The purpose of the umbrella is to disperse the light of the bulb. Without this dispersion the light might not reach certain areas of the scene and consequently, some of the characters. We used the more reflective metallic umbrella as we found that with the blinds down on the windows and the interior lights off, there was nowhere near enough light for anything to be seen in the camera.
Storyboard
I was tasked with with drawing out the storyboard. This is not to say that I did it all myself however. Me, Nigel and Stephen sat ourselves down and went over the script and how we wanted it to appear in the filming. We discussed things like Shot size, Character composition, Set design and Facial expressions. I drew the majority but to accelerate the process we all pitched in so we could move onto filming as soon as possible.
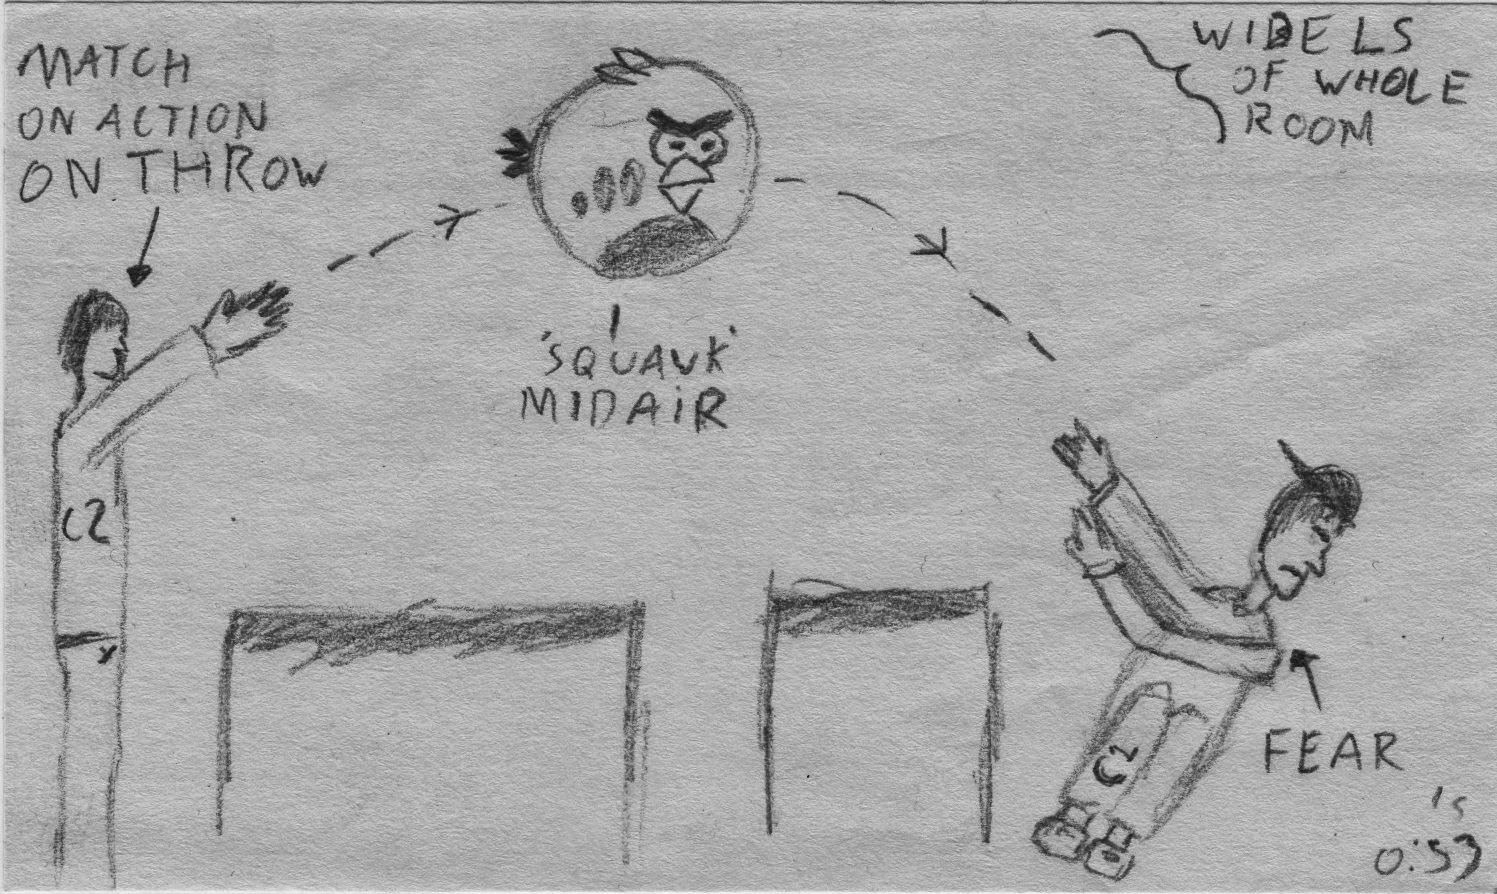
This below is the storyboard that was concocted from our ideas and the script. Going from left to right down it shows how the film will appear once filmed and edited.
This below is the storyboard that was concocted from our ideas and the script. Going from left to right down it shows how the film will appear once filmed and edited.
 |
| 1 |
 |
| 2 |
 |
| 3 |
 |
| 4 |
 |
| 5 |
 |
| 6 |
 |
| 7 |
 |
| 8 |
 |
| 9 |
 |
| 10 |
 |
| 11 |
 |
| 12 |
 |
| 13 |
 |
| 14 |
 |
| 15 |
 |
| 16 |
 |
| 17 |
 |
| 18 |
 |
| 19 |
Friday, 19 December 2014
Casting!
We didn't spend too long casting because we knew people who would be interested in being in our short sequence around our friend group, the actors we looked at filming fit with characters well and allowed us to bring it to life.
We made sure there was an understudy just in case Kieran was unable to film last minute, but Kieran made it and we were able to make good use of his services.
Character 1:
Firstly Ben wanted to play the part of the cowardly protagonist, Stephen and I thought this was a good idea because Ben is very energetic and able to act scared and be able to act his lines. He knew exactly what we all wanted from the sequence so this made it easier for all his shots. His reactions when filming created the moods we were seeking to achieve, starting serious and ending up more comical and humorous.Character 2:
I didn't have to search too far to find our antagonist, Kieran. After Stephen had made sure his costume would make him seem crazier and fit the role of character 2, he was perfect for the imagined sequence. His acting close up was perfect and made the short film increasingly realistic and dramatic, a great contribution to the sequence.We made sure there was an understudy just in case Kieran was unable to film last minute, but Kieran made it and we were able to make good use of his services.
Character 3:
This might not be defined as a character, but we needed someone to portray the voice of Simon in the editing process and add in as a Foley, as he was only a prop Angry Bird. Ben filled this role, recording his best bird noises, which meant we could choose from a dozen samples.Costume and Props!
Costumes:
In our sequence we decided to base our two characters from two different social groups. Out first, protagonist, character will be dressed in an 'urban' style. He will be wearing a snap back hat and a polo shirt to help with this vibe.Our secondary character, whom is an antagonist, will be wearing a business style outfit, with a fancy, stylish hat and a black suit tie.
Props:
For the sequence we have chosen to use a variety of props, most come in the form of furniture.We will be using tables as a background setting, to give off an active vibe. There will also be a chair which will be pushed away, thus having to be a chair with wheels on it.
Our third character will also come in the form of a prop- it being a plush toy angry bird. Being plush makes it easier to throw around and less damaging if it hits. Additionally making it easy to store and bring into college, if our filming lasts more than one day.
We will also have a photograph of a crashed hot air balloon, a 'cold air balloon', which will form a basis of one of our jokes in the sequence. Being pinned on the wall requires a firm backing, which our location has. This use of decor will help to create an active and yet vacant ambiance, showing off the antagonists loneliness and his solace in his surroundings.
Location!
We didn't have to go far and chose the room Gf 05 in the college to use for our location. This room is free when we are able to film and gives us the ability to complete our sequence to how we imagined it. This room has everything we need for the location as we could change the lighting, because we can shut the blinds and turn the outside light off as well as the door was in one corner of the room, so it would give us the effect we asked for. We need the space to act which we can get if we move the furniture and props around, complete the actions within the sequence and to be able to film without including filming equipment (like the lights) in shot. Overall, this room is perfect for our sequence.
Here are some images of the location:


.JPG)
Here are some images of the location:
Friday, 5 December 2014
Allocated tasks
Stephen
 |
| Storyboard |
Filming responsibility
Nigel, Ben and Stephen
In charge of all tasks related to filming and producing the content both on and off set.
Storyboard artist
Ben and Nigel
In charge of taking all film ideas and visualizing into art.
 |
| Casting call |
Location Scout
Nigel
In charge of finding filming location, reviewing with others, check health & safety and organizing everyone there to do art.
Prop Manager
Stephen
In charge of acquiring props to include in the filming to improve art.
Casting Director
 | |
| Director |
In charge of finding, collecting and organizing actors around set to do art.
Director of filming
Ben
Directs the actors and cameras to achieve what was pre imagined in the storyboard's art.
Tuesday, 2 December 2014
Preliminary Task Brief
Media Studies Foundation Portfolio Dec – Jan 2014-15
The Preliminary Task.
The specification
states that this must be:
‘A continuity task involving filming and editing a
character opening a door, crossing a
room and sitting down in a chair opposite another character with whom she/he
then exchanges a couple of lines of dialogue.’ The sequence must last no longer
than one minute.
This task
should demonstrate:
- Match
on Action
- Shot/Reverse
Shot
- The 180 degree Rule
You will also have to incorporate Music, Lighting, Dialogue and Sound effects into your film.
All filming must take place on campus.
Stage one:
Form a group of 3-4 students.
Stage two:
Create and set up the group blog assuring everyone knows the URL and password.
Posts ONE to FOUR
- A copy of the Preliminary task sheet.
- Explanation of the 180 Degree rule.
- Explanation of a Shot/Reverse Shot.
- Explanation of a Match on action.
Post FIVE
Allocate tasks below to group members.
- Camera operator
- Filming responsibilities
- Storyboard artist(s)
- Location scout(s)
- Prop manager
- Casting director
- Filming director
Stage three:
Post SIX
Upload the drawn storyboard
Stage four:
Post SEVEN
Record this in the blog under the title of Pre-Production planning- Identify coinciding free study periods on group member's timetables and plan to film
- Agree on who is responsible for vrious aspects of Mise en scene
- Organise all equipment
- Conduct a risk assesment for the shooting location
Stage five:
Post EIGHT
Blog the evidence of the filming taking place (Images, video footage) and evaluate what went well and what didn'tStage six:
Post NINE
Blog the evidence of the editing process (Images, video footage) that shows everyone in the group was involved.Stage seven:
Post TEN
Blog discussion about sound editing (Music, dialogue etc.)Shot Reverse-Shot
 A Shot Reverse-Shot is a common filming technique used in just about every scene with dialogue.
When two or more characters are engaged in dialogue, it is not particularly appealing for the cameras to stay fixed on one character, as the other(s) continue conversing. It is acceptable while this character is talking, however, if the audience is going to spend two or more minutes watching someone listening to a conversation and occasionally responding, they might as well leave. To remedy this, the camera must move using a transition (an editing technique to change camera angle and framing) onto a new character. This will be done right after the first character's dialogue has finished, that is when a cut (the quickest transition) is used to show the second character, just as their dialogue begins. This new shot will be a mirror image of the first in terms of size and composition. If the character one is shown in a Close Up to the left hand side of the frame, character two is shown in a Close Up to the right hand side. The cameras must stay on one side of the characters* so not to confuse the audience. To help make it clearer to the audience that the conversation is still going on, the camera can include an Over The Shoulder framing technique which always shows the two characters. This is done by having any part of their body still showing during the other characters dialogue. This body part can anything but is most typically the side of the head or the head and shoulders. Alternatively, not using an Over The Shoulder shot and just having a character in the frame can work just as well. Use image provided to supply as an example.
- Benjamin.
*See 180 Degree Rule.
The 180 degree rule
 The 180 degree rule is a line which passes between two or more characters. On this imaginary line, an imaginary semicircle is created where the cameras are allowed to go to make sense to the audience, but if a camera is placed on both sides, the rule is broken.
It is used so characters eye line matches and isn't broken as characters will face the same way and applying it correctly means it doesn't become too confusing for the viewer to watch.This does mean that it is acceptable for the 180 degree line to be crossed if the viewer is taken across in one shot, a pan for example.
Match on Action
A match on action is where there is a continuous flow in the movement of a character, detailing certain aspects of the movement; such as the footfall of the character- if they're going fast or slow, creating a tenser atmosphere or relaxing the viewer. This type of cut can also show a disturbance in the movement of a character, for example the opening of a door- where the disappearance of the character from one angle is followed through with the close up of a hand, following through again to the appearance of the character again from a different approach.
This cutting technique is used to allow a breach in setting or scenery, or to create a fast paced scene, or slow paced scene, depending on other aspects of the sequence- such as speed and sounds. Match on action is also vital in the continuity of a scene, allowing the viewer to fully understand the sequence, even if it's a completely new set

This cutting technique is used to allow a breach in setting or scenery, or to create a fast paced scene, or slow paced scene, depending on other aspects of the sequence- such as speed and sounds. Match on action is also vital in the continuity of a scene, allowing the viewer to fully understand the sequence, even if it's a completely new set
Subscribe to:
Comments (Atom)